


React 19 brings a host of exciting new features and enhancements designed to improve the development experience and make UIs more responsive. Let's dive into the key updates and see how they can transform your workflow.
New Transition API
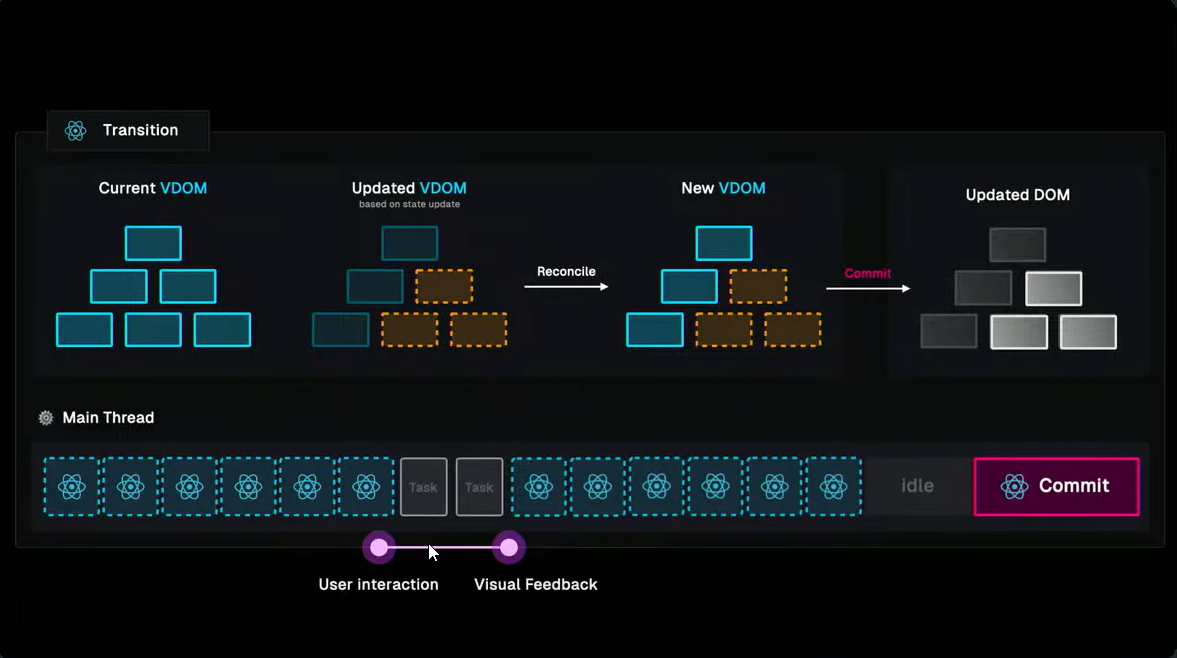
Transition API useTransition is introduced in react 18, user events like typing and clicking are crucial for a responsive UI. Without instant feedback, the interface feels sluggish. React 18 introduces the Transition a client api, which prioritizes user events and defers less urgent state updates. The new Transition api allows asynchronous functions to be executed without blocking the main thread.
startTransition(async () => {
  await updateData();
});
Before Transition was introduced
import React, { useState } from "react";

function UpdateData() {
  const [name, setName] = useState("");
  const [data, setData] = useState(null);
  const [isPending, setIsPending] = useState(false);

  const handleSubmit = async (e) => {
    e.preventDefault();
    setIsPending(true);

    try {
      const response = await updateData(name); // Assuming updateData function exists
      setData(response.data);
    } catch (error) {
      console.error(error); // Handle errors here (optional)
    } finally {
      setIsPending(false);
    }
  };

  return (
    <form onSubmit={handleSubmit}>
      <label>Website Name:</label>
      <input
        type="text"
        value={name}
        onChange={(e) => setName(e.target.value)}
        required
      />
      <button type="submit" disabled={isPending}>
        {isPending ? "Saving..." : "Update Data"}
      </button>
      {data && <p>Data Updated!</p>}
    </form>
  );
}

export default UpdateData;
After Refactoring with useTransition
const [name, setName] = useState("");
const [data, setData] = useState(null);
const [isPending, startTransition] = useTransition();

const handleSubmit = () => {
  startTransition(async () => {
    const data = await updateData(name);
    startTransition(() => {
      setData(data);
    });
  });
};

return (
  <div>
    <input onChange={(e) => setName(e.target.value)} />
    <button onClick={handleSubmit}>
      {isPending ? "Updating..." : "Update"}
    </button>
    {data?.success && <span>Changes saved!</span>}
  </div>
);
Before Refactoring: The component uses a useState hook to manage isPending state manually to indicate if an asynchronous operation is in progress.
After Refactoring: The component uses the new useTransition hook to manage the transition state more efficiently. startTransition is called to wrap the async function, ensuring that user interactions remain smooth even during state updates.
React Actions
In React 19, functions triggering transitions are called actions. The useActionState hook helps create actions seamlessly. we learned what is transition in react 18.
const [actionState, isPending] = useActionState(updateData, initialState);
Refactoring with useActionState
The useActionState hook takes two arguments: an async function and an initial state. It also provides the pending state. The new React DOM supports passing actions in forms, buttons, and inputs.
import { useState } from "react";
import { useActionState } from "react";

const MyComponent = () => {
  const [name, setName] = useState("");
  const [data, action, isPending] = useActionState(
    async (name) => {
      const data = await updateData(name);
      return data;
    },
    null // initial state
  );

  const handleSubmit = () => {
    action(name);
  };

  return (
    <div>
      <input onChange={(e) => setName(e.target.value)} />
      <button onClick={handleSubmit}>
        {isPending ? "Updating..." : "Update"}
      </button>
      {data?.success && <span>Changes saved!</span>}
    </div>
  );
};

export default MyComponent;
Additionally, React 19 introduces the useFormStatus hook, which simplifies tracking the status of the last form submission.
The useFormStatus hook returns an object with { data, isPending, method, action } and should be invoked within the form component.
Optimistic Updates with useOptimistic
The useOptimistic hook updates the UI before an action completes, making interfaces like chat and comments feel more responsive.
const [allFormValues, optimisticValue] = useOptimistic(submitForm);
Example Usage
const [allValues, seOptimisticValue] = useOptimistic(
  state,

  (currentState, optimisticValue) => {
    return [...currentState, optimisticValue];
  }
);
React Server Components (RSC)
Traditionally, we render UI using Server-Side Rendering (SSR) or Client-Side Rendering (CSR). RSC changes the game by sending component payloads to the client separately. We can use Suspense to wrap RSCs, displaying skeletons or loaders until data is ready.
Note that hooks like useState and useEffect aren't available in SSR, but the new use client API lets you read the value of a promise or context effortlessly.
const contextValue = use(myPromise);
Server Actions
Server actions allow client components to call async functions on the server. This feature simplifies data fetching and processing on the server side.
JSX Ref Enhancements
React 19 simplifies handling refs by allowing them as props in function components, eliminating the need for forwardRef.
function MyComponent({ ref }) {
  return <input ref={ref} />;
}
Callback refs now support cleanup functions, such as removing event listeners.
Input() {
  return (
    <div>
      <input ref={(ref) => {
        return () => {
          ref.removeEventListener('change', handleInputChange);
        };
      }} />
    </div>
  );
}
Native Support for Title and Meta Tags
React 19 natively supports title and meta tags, which were previously handled by the Helmet library. These tags are automatically hoisted to the document.
Before
<Helmet>
  <title>My Page</title>
  <meta name="description" content="My page description" />
</Helmet>
After
import { useState } from "react";
import { useActionState } from "react";

const MyComponent = () => {
  const [name, setName] = useState("");

  return (
    <div>
      <title>React 19 Page</title>
      <meta name="description" content="My page description" />
    </div>
  );
};

export default MyComponent;
React Compiler
Forget about manual optimization with React Compiler. This tool automatically applies fine-grained memoization, eliminating the need for memo, useMemo, and useCallback.
yarn install eslint-plugin-react-compiler
# or
npm install eslint-plugin-react-compiler
Use the following command to optimize your project:
npm optimize
React Compiler is just computer science, not magic.
Conclusion
React 19 is a significant leap forward, making development faster, smoother, and more efficient. From the new Transition API to native support for title and meta tags, these updates are sure to enhance your development workflow. Get ready to embrace the future of React!
